Welcome Guest!!

Welcome to SCCX, for full access to the forums, please register and join our community, it's free.

Author Topic: Joe's Xterra  (Read 144781 times)

Sage Bromax

  • Hero Member
  • *****
  • Posts: 848
  • 4wd Pts: 15302
    • 2015 Pro-4XM6 Silver
Re: Joe's Xterra
« Reply #150 on: December 29, 2016, 08:44:11 PM »
Regarding the trailer electrical plug, to install it you have to disassemble the factory plug.  Look at it close and you can see where the two parts separate.  Otherwise, you won't get the 90 degree plug to go through the hole.
“I am free, no matter what rules surround me. If I find them tolerable, I tolerate them; if I find them too obnoxious, I break them. I am free because I know that I alone am morally responsible for everything I do.” ― Robert A. Heinlein

JFanaselle

  • BOD
  • Hero Member
  • ******
  • Location: Murrieta, CA
  • Posts: 2351
  • 4wd Pts: 12000
    • 2010 Xterra S 4x4
Re: Joe's Xterra
« Reply #151 on: January 02, 2017, 09:15:45 PM »
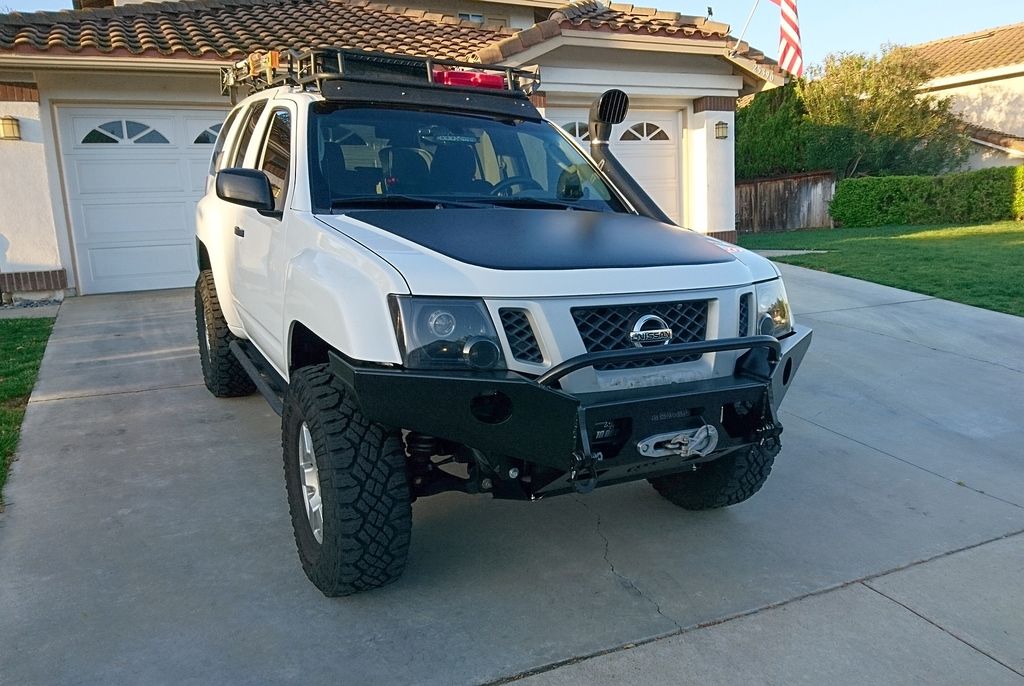
My "backside" project is nearly complete. Bumper has finally been mounted (took forever for my license plate mount and light to arrive). The camera and air fitting hole came out great. Sorry fourxfunk... I didn't measure the hole before I installed the plug, but I have an aftermarket (non-OEM) plug anyway. :(

I also removed the rear plastic corners and treated them with a product called "forever black," plus installed LED light pods in them. The lights are wired to a single pole, double throw switch that will allow them to be on all the time, off all the time, or on with the reverse lights. Very happy with how they came out, and with how the forever black came out on the plastics (although, I had to do 4 applications before the streaking was gone).

I also removed the 20" light bar from the rear roof line and added a new Whelen TIR3 red light as a 3rd brake light in between my two Whelen amber strobes. I've followed a few rigs on desert expeditions with an aftermarket outside-mounted 3rd brake light, and it's a life saver in heavy dust! I'm awaiting the arrival of some new LED ligths that will be mounted between the strobes and the brake light to replace the 20" light bar I removed.

Some photos:

Finished product on the bumper, corners and lights:
 [ You are not allowed to view attachments ]

Process underway:
 [ You are not allowed to view attachments ]

Applying "Forever Black" to the rear plastics:
 [ You are not allowed to view attachments ]

 [ You are not allowed to view attachments ]

3rd brake light added to rear lightbar mount:
 [ You are not allowed to view attachments ]


JFanaselle

  • BOD
  • Hero Member
  • ******
  • Location: Murrieta, CA
  • Posts: 2351
  • 4wd Pts: 12000
    • 2010 Xterra S 4x4
Re: Joe's Xterra
« Reply #152 on: January 29, 2017, 10:02:49 PM »
M226 axle swap project is complete. I removed the 3.13-geared C200 and replaced it with a 3.36-geared M226 with an e-locker. I also swapped out the front R180 diff for another R180 with 3.36 gearing (with help from knightrider). The project also included installation of new OME medium duty leaf springs and bushings, and a PRG u-bolt flip kit. Some photos:

Getting everything acquired and ready. This was about a 6 month process to get everything I needed, including tools, parts, fluids and other items:
http://i231.photobucket.com/albums/ee234/jfanaselle/DSC_0568.jpg
Joe's Xterra


M226 axle prepped for install. I gave it a good bath in foaming degreaser, removed the outer abs sensor wire tabs (for the u-bolt flip kit), hit a few spots with some black spray paint to prevent rust, removed the diff cover and inspected the gears, painted and re-installed the diff cover, installed the new breather tube nipple, and swapped most of the brake parts over from the C200 that was on the rig (i just kept one side of the e-brake intact, everything else moved over from my C200):
http://i231.photobucket.com/albums/ee234/jfanaselle/DSC_0626.jpg
Joe's Xterra


Old axle and leafs removed. New axle sitting on it's perch, ready to be installed:
http://i231.photobucket.com/albums/ee234/jfanaselle/05.jpg
Joe's Xterra


New OME leaf springs in place, ready for new axle to slide in:
http://i231.photobucket.com/albums/ee234/jfanaselle/08.jpg
Joe's Xterra


New axle in place, mounted up with PRG u-bolt flip kit:
http://i231.photobucket.com/albums/ee234/jfanaselle/10.jpg
Joe's Xterra


Finished product:
http://i231.photobucket.com/albums/ee234/jfanaselle/12.jpg
Joe's Xterra

Riz98

  • Full Member
  • ***
  • Location: Lemoore
  • Posts: 143
  • 4wd Pts: 8
  • PBR ASAP
    • 2002 Nissan Xterra
Re: Joe's Xterra
« Reply #153 on: February 04, 2017, 10:05:17 AM »
Looks great.  Having the rear locked makes such a big difference.  Have you had a chance to take it out for a shake down run yet?

JFanaselle

  • BOD
  • Hero Member
  • ******
  • Location: Murrieta, CA
  • Posts: 2351
  • 4wd Pts: 12000
    • 2010 Xterra S 4x4
Re: Joe's Xterra
« Reply #154 on: March 27, 2017, 10:44:27 AM »
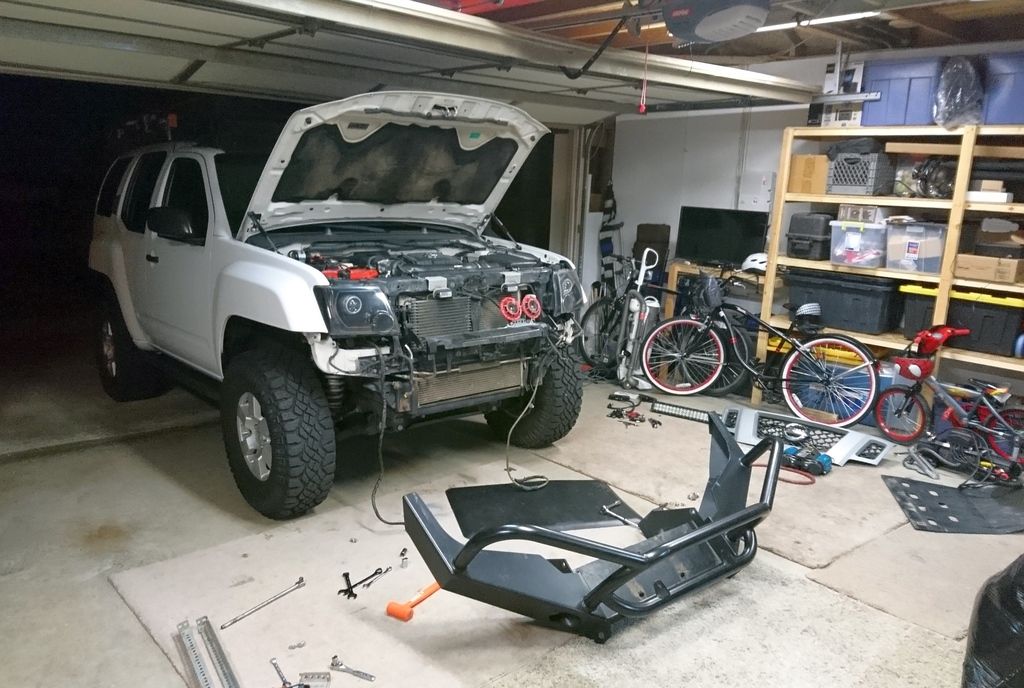
New Hefty aluminum front bumper has been installed, but there is still much work to be done. Here's what I managed to accomplish so far:

Removed the old front bumper and quickly found it a new loving home:
http://i231.photobucket.com/albums/ee234/jfanaselle/Bumper01.jpg
Joe's Xterra


I rolled around for about a week with no bumper cover (just the OEM metal bumper re-installed, for protection). I was actually starting to dig the aggressive look :)
http://i231.photobucket.com/albums/ee234/jfanaselle/Bumper02.jpg
Joe's Xterra


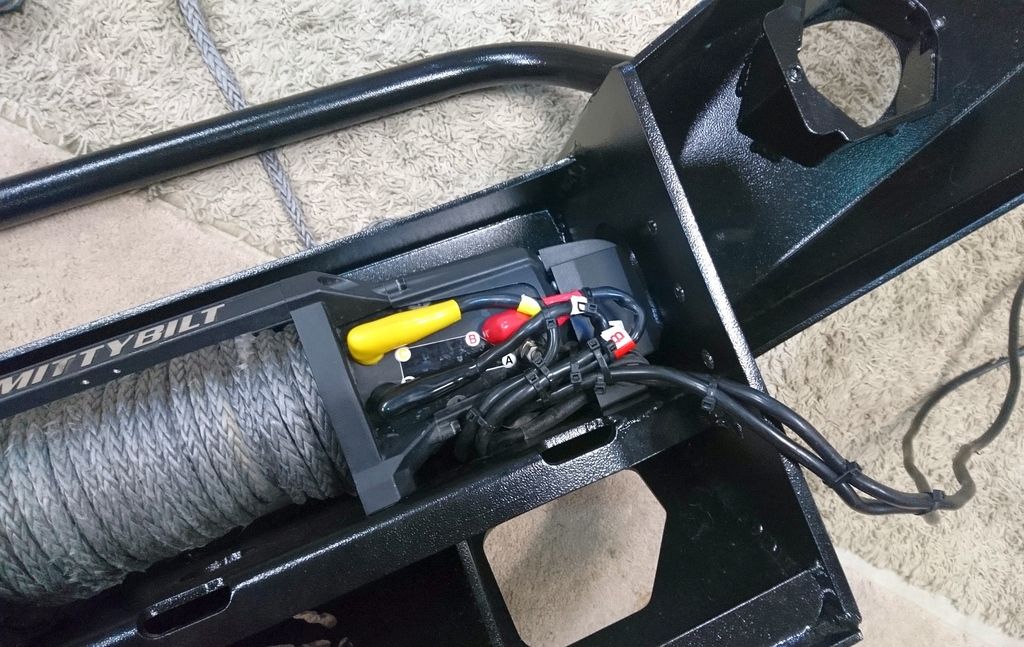
Finally had a chance to work on it more on Friday. Got my winch installed in the bumper during the day. This took much longer than expected, as I ran into some issues clocking the gearbox of the winch (the clutch lever wouldn't have fit without clocking it). The gearbox basically fell apart when I tried to clock it, and I had to put it all back together. What a horribly messy and unpleasant job. Once mounted up, I was excited that there was enough room to fit the solenoid box inside the bumper next to the winch. Note that the solenoid boxes on these X2O winches are advertised as being IP68 rated, along with the winch itself. It wedged perfectly between the edge of the bumper and motor housing:
http://i231.photobucket.com/albums/ee234/jfanaselle/Bumper03.jpg
Joe's Xterra


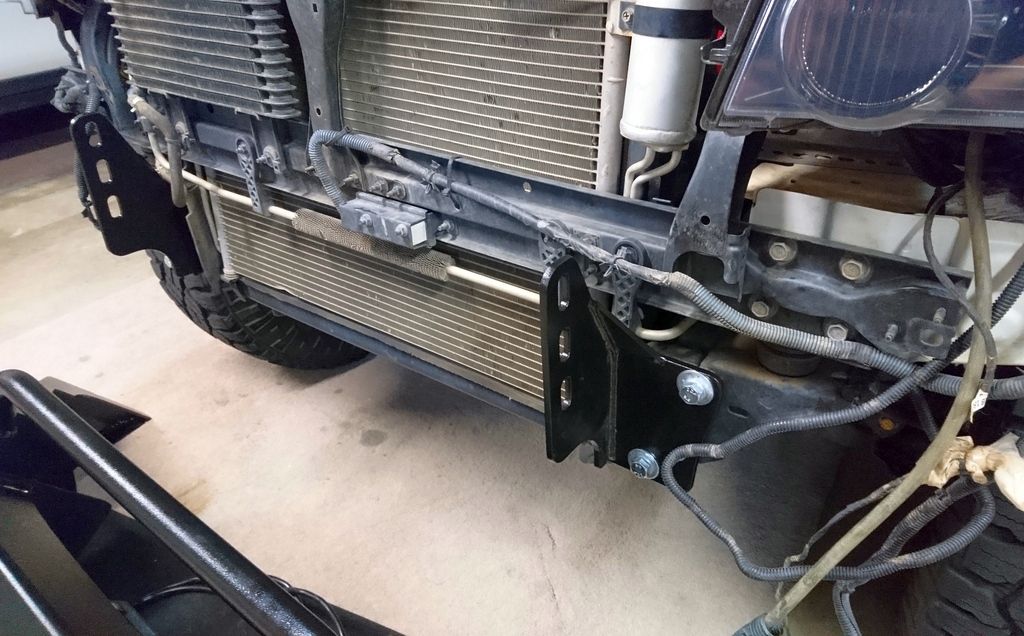
New bumper brackets mounted up to the frame. The setup still uses the steel hefty brackets (only the bumper and rad skid are aluminum):
http://i231.photobucket.com/albums/ee234/jfanaselle/Bumper04.jpg
Joe's Xterra


The bumper is SUPER light... the whole setup with the brackets, rad skid and bumper itself is like 65 lbs. But once the winch is mounted, it's still a bit too much for one person to do without a little assistance. Thankfully, it was light enough to jockey into position and I used a floor jack to help with the rest:
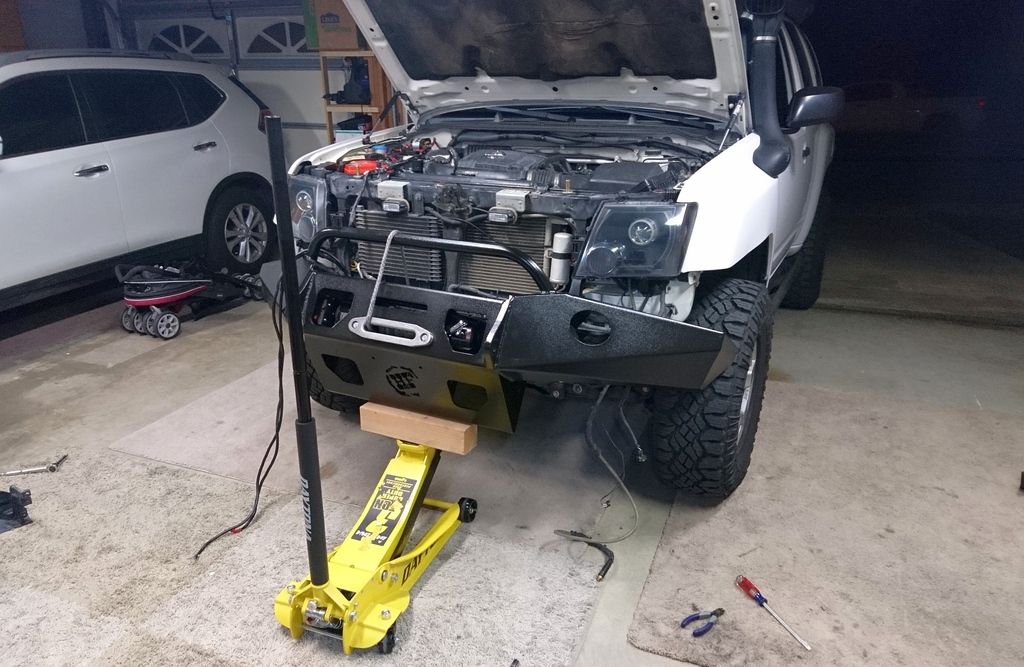
http://i231.photobucket.com/albums/ee234/jfanaselle/Bumper05.jpg
Joe's Xterra


All mounted up. I love how it looks:
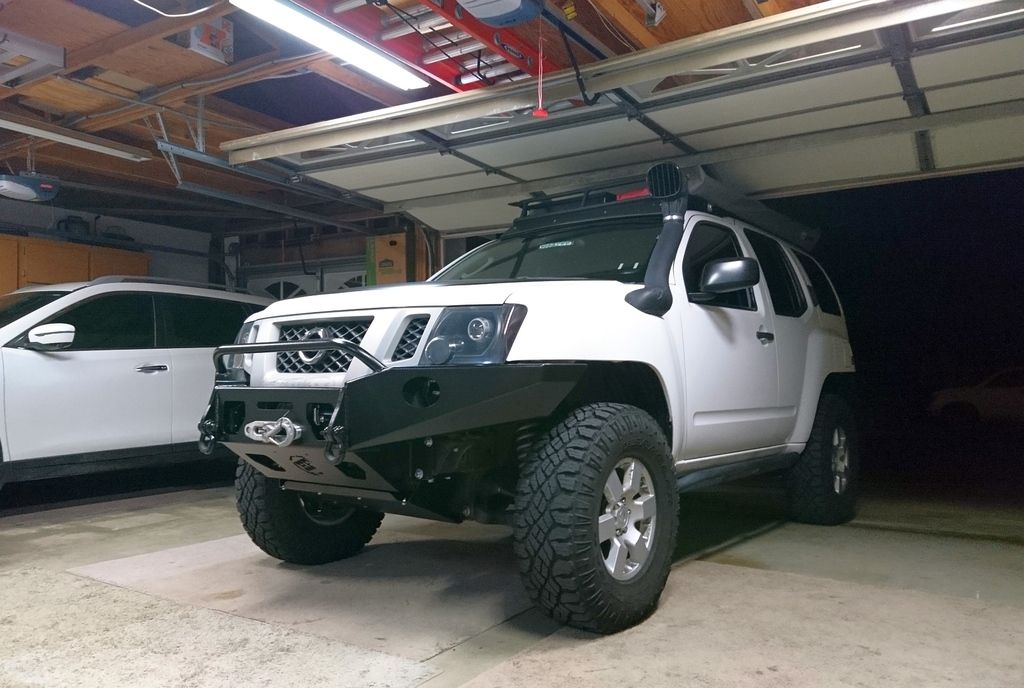
http://i231.photobucket.com/albums/ee234/jfanaselle/Bumper06.jpg
Joe's Xterra


http://i231.photobucket.com/albums/ee234/jfanaselle/Bumper07.jpg
Joe's Xterra


What's next: I still need to mount my fog lights. The Calmini bumper held the fog light assemblies with their four bolts that attach them to the round mounting bracket that fits on the OEM bumper. Unfortunately, I discarded the round brackets when I got rid of my OEM bumper, so I'm stuck having to buy new brackets or maybe even new fog light assemblies. If I can't get my hands on a set of brackets from a junk yard or something, then I may just buy a set of cheap aftermarket "OEM style" lights and use only the brackets. I can get a set for $45 or so on eBay.

I also need to work on a way to mount my ARB twin air compressor behind the grill. I have blinky lights back there that may be in the way and may need to be relocated (I already relocated my Hella horn when I mounted the bumper). I'll have to fab up some kind of bracket to hold it in place, so plenty of internet research (mostly reviewing photographs) awaits me...

Finally, I will be painting my grill. You can probably see in the images that the bottom is scuffed up to hell from the cover I had over the winch with my old bumper. I plan to paint it black and probably install some mesh in place of the factory plastic honeycomb, but I'm still thinking about that one.

RBduffer

  • BOD
  • Hero Member
  • ******
  • Location: Fallbrook of course
  • Posts: 1883
  • 4wd Pts: 135
    • '07 OR Xterra
Re: Joe's Xterra
« Reply #155 on: March 27, 2017, 10:57:36 AM »
Well done Joe.  I love the cut of that bumper, functional and just BadAss.
Of all the things I've lost...
I miss my mind the most

KJ6YPO

GreenAcres

  • Full Member
  • ***
  • Location: Irvine
  • Posts: 124
  • 4wd Pts: 9
    • 2007 XTerra Off Road
Re: Joe's Xterra
« Reply #156 on: March 27, 2017, 04:43:04 PM »
Lookin good, Joe!

I'm curious how the bump stop interfaces with the flipped u-bolt plate. Does it just nicely fit between the bolts and hit flat on the plate? More specifically, I'm wondering how the Timbren bump stops work with flipped u-bolts. I already have the Timbrens. Not sure I want to go the flip route if there are going to be interference issues.

In any case, that's a lot of mods you've got going on there, I'm sure it'll be great seeing how much it improves your rigs capability!

JFanaselle

  • BOD
  • Hero Member
  • ******
  • Location: Murrieta, CA
  • Posts: 2351
  • 4wd Pts: 12000
    • 2010 Xterra S 4x4
Re: Joe's Xterra
« Reply #157 on: March 27, 2017, 09:39:05 PM »
There's actually a pretty good space between the bolts, so the bump stop gets in there ok. Honestly though, I can't remember the last time I hit my bumpstops, and I'm only at 2.5 inches of lift. I suppose if you were in a really flexy position where the rear was very articulated, you could end up hitting the bolts, but that likely would not be happening at any kind of speed, so I don't think it would damage the timbren.

Jayrat

  • Hero Member
  • *****
  • Location: SAN DIEGO / WPG
  • Posts: 1617
  • 4wd Pts: -667
  • FLBLFY
    • 2013 X
Re: Joe's Xterra
« Reply #158 on: March 29, 2017, 08:33:28 AM »
Looking good Joe,
boy that rig has changed in just a few years
You can pick your nose & you can pick your friends,   But you can't wipe your friends under the couch

xxSVxx

  • Hero Member
  • *****
  • Location: Oceanside, CA
  • Posts: 1479
  • 4wd Pts: 10093
  • Something inspiring, witty and funny goes here
    • 2010 BAMF version
Re: Joe's Xterra
« Reply #159 on: March 29, 2017, 10:25:08 AM »
Looking good Joe,
boy that rig has changed in just a few years

took the words right out of my mouth...man, have you done a great job, Joe!!!!

JFanaselle

  • BOD
  • Hero Member
  • ******
  • Location: Murrieta, CA
  • Posts: 2351
  • 4wd Pts: 12000
    • 2010 Xterra S 4x4
Re: Joe's Xterra
« Reply #160 on: March 29, 2017, 11:16:44 AM »
Thanks guys. :) I'm very happy with how it's coming along.

Now that I'm at the proper gearing, I'm really thinking about a T-swap. I realized that I'm still dealing with a good amount of coil bucket contact, especially on the driver side. Even with PRG upper control arms, the coil buckets on the later model rigs are wider and some are worse than others. We cut/trimmed the coil buckets when we installed the lift components, but I guess we didn't do enough on the driver side. With the new lighter bumper, the front end came up about an inch and the UCA is literally resting right on the coil bucket. :( So, that means I need to pull everything apart and trim them more. But my logic is... a Titan swap takes care of that problem also.  >:D I already have a set of top spacers for my extended 2.5 radflos to make them Titan length. I understand I won't have as much travel as genuine titan length coils, but it's a good hold-over for now and would split up the cost of the project a little, allowing me to focus on acquiring the diff, UCAs/LCAs and other misc components first.

But... my roof rack is still an issue. It's very high on my priority list to keep my rig garaged, especially since I keep my camera gear in there. Property crimes are a big deal in my quiet little town, and I'll be damned if someone is going to break in and take all my stuff. So with my current roof rack setup, I can't go even an inch higher in the suspension without hitting my door on the way in. I LOVE my Insain aluminum full replacement rack, and I load the crap out of it when I take camping trips, but it's the full basket style and the sides are about 5 inches tall. So that's the compromise if I decide to do a T-swap. I did kept my OEM rack stored in my garage, but I dont' really want to give up my roof space. So it seems the most logical solution is to replace my rack with something lower profile (like a Gobi Stealth, or the Frontrunner rack with the "Toro mod"). If I get a big enough annual bonus from my work this June, I'll pull the trigger on the new rack and my aluminum Insain rack will be looking for a loving new home on the roof of another So Cal Xterra. :)


CAWoody

  • Hero Member
  • *****
  • Location: Evergreen, CO
  • Posts: 970
  • 4wd Pts: 72
    • 2018 Toyota Tacoma (Really miss the X)
Re: Joe's Xterra
« Reply #161 on: March 29, 2017, 11:33:01 AM »
When you pull that trigger, keep me in mind for your Insain rack.
Be careful when you follow the masses..... sometimes the "M" is silent.

RikRong

  • Administrator
  • Hero Member
  • *****
  • Location: Freedom Country
  • Posts: 1429
  • 4wd Pts: 71
    • 2015 Pro4X Xterra
Re: Joe's Xterra
« Reply #162 on: March 29, 2017, 12:58:11 PM »
I just clear my garage door.  If the fuel tank is empty or it's hot outside, I think I barely touch the seal on the door.  You've seen the truck as it sits now and it's not very high.  I think you can manage the TS, without adding a ton of height.  As it is right now, I think your truck sits higher than mine.  If you dial down the coilovers and install the spacer, you might be golden.  I'm in the same boat as you, I don't keep gear in my truck, but I refuse to let it sit outside, if at all possible.   
R. Long
2015 Metallic Blue P4X-->Clicky

knightrider

  • Administrator
  • Hero Member
  • *****
  • Location: San Diego, CA
  • Posts: 2527
  • 4wd Pts: 228
    • 2016 Pro4x
Re: Joe's Xterra
« Reply #163 on: March 30, 2017, 10:24:15 AM »
another option would be to have your rack lowered, you could have all the uprights on the basket cut, maybe an inch or two and welded back together.
Jordan - K6XTE
2012 Knight Armor Xterra Pro-4X - Sold :(
2016 GunMetal Frontier Pro-4X with AT Summit

Ghost65

  • Old-Schooler
  • Hero Member
  • *****
  • Location: East of You
  • Posts: 862
  • 4wd Pts: -476
    • 2019 Ready Mix Taco
Re: Joe's Xterra
« Reply #164 on: March 30, 2017, 11:20:57 AM »
Or...air down to garage park.  A bit of a hassle, but cheaper than re-welding or demo-ing your garage... :D
KD6DCI

Once again, I must state for the record: We are not a club, we are enablers for your addiction.


Powered by EzPortal